Showing posts with label Technique. Show all posts

Friday, October 7, 2011

Black Magic! (With JUGS)

Happy Weekend! BEFORE we go any further - let me share out newest secret with you - we chose our new Design Team members. YES memberS! Thanks to all who answered our DT call! It was a tough call and in the end we had two gals who were 1 vote apart! SO we decided more was better and we have asked TWO gals to join our team.

PLEASE join me in welcoming our TWO new design team girls:
Lynn Magnan AND Vicki Dutcher

Ok let's get down to business. It's time for a new technique challenge with Just Us Girls. This week our lovely hostess is Andrea and she has a great technique to try - it's called Black Magic and you can find a link to the tutorial for it on SCS if you click HERE.

This was new for me and I will tell you that I had more than one go at it - It helps to use a "solid" image (in my opinion) to do this technique. Here's what I finally came up with. You have to tryst me - it's VERY striking in person - a bit "flat" looking in the photo but it's very vivid and quite lovely in real life. I will use this technique again. Thanks Andrea.


SO gals - get your groove on - get your stamps out and play along with Just Us Girls this week.  Please visit our AWESOME design team (my side bar) for some additional inspiration. Please be SURE you stop and visit our Featured Designer, Maureen Plut - she is doing some fantastic projects with us.

Have a blessed weekend. For those of you who get Columbus Day off - enjoy!
Hugs n Smiles.

Stampin Pam

FOR THE COMMENTER WHO ASKED ABOUT THE HOPE STAMP - the butterfly AND words come from GinaKDesigns Hope is Faith stamp set. No way to contact you - sorry.

Friday, September 9, 2011

It's a texting world! JUGS style!

Hey all you JUGS fans. Boy do we have some fun for you this week. Oh wait - I think SOME of you are waiting to see who last week's blog candy winners are....

Each JUGhead (that's our pet name for each other) has posted their winner on their blogs and MY winner of my blog candy is.... DRUMROLL.....

Janine B!! 
Please email me (link in my sidebar) your snail mail address so I can send your goodies to you - CONGRATULATIONS and thank you for being such a longtime and loyal JUGS follower!!

Ok - now for this week's challenge... it's Dana's turn to be our hostess with the mostest and she wants us to delve into the world of TEXT! Yep - pull out your sentiments and put together a background (or your main focal point) from a selection of text stamps...
 
I made a text-based card a couple of years ago for PTI blog hop and I'm really glad to try this again.
Here's the FIRST card I did this with two years ago for my son's graduation from Paramedic School. The text became the whole card.


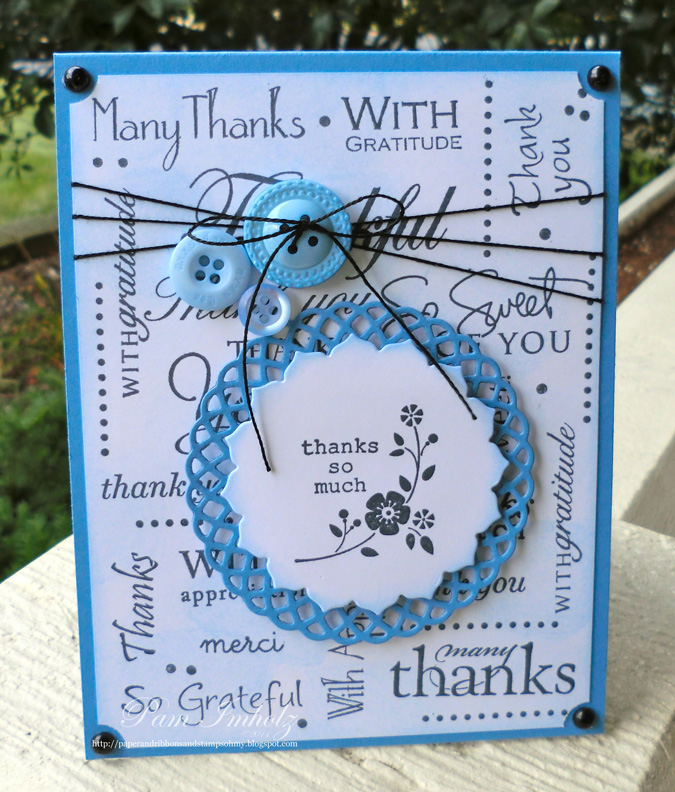
Here's the card I made for this week's challenge - I needed a unique thank you note and so mine is all about the thanks! I did the BG but then added some more to this one.


I used just about every thank you stamp I had from MTME, PTI, GinaK Designs and even Stampin Up!
I just randomly stamped the BG - filled it in with a few dotted lines for "filler" and then added a focal point, some string and buttons. Simple enough but a fun result. Hope you will play along with us too!

Have a good weekend - my son is up visiting from Texas so it will be a GREAT weekend for me.

Hugs n smiles.
Stampin' Pam

Friday, August 12, 2011

JUGS 97 Notebooks!

G'Day gals,
Yes, I'm still relishing in the after vacation splendor of my trip "Down Under", especially as I sort through all the photos! Here's a link to my photo post if you're interested.

It's a technique Saturday with JUGS - Maria is challenging us to do an altered notebook - any size. With school right around the corner again I bet notebooks are a hot topic right now.

This is my project - the design is from Nicole Heady from the stampin cruise I took a couple of years ago but I loved it so then and decided it was time to re-create one for today's notebook challenge. I'm also using this for Mona's CR84FN Color Challenge!


And here's my Altered Notebook:

This is a 5x7 notepad. Nice size for notes - I kept mine by the phone till it was used up - so I may just gift this to me! :-)


Here's the back - just simple Polkadots..

And a look at this when it's open - you see that the left side has a "pocket" for tucking in lists, or receipts, or notes or even an envelope or two.


Hope you will join us this week and show us YOUR notebooks. Check out the design team in my sidebar and see what the gals have for you. I promise it will be worth a look. Have a great weekend,

Hugs n Smiles,

Friday, May 13, 2011

Kissing with a Twist

Good morning ladies. It's a Just Us Girls technique challenge. Today Kristin is our hostess and she has challenged us to use the Kissing With a Twist technique. If you are not familiar with this technique here is a link to the tutorial on SCS or you might want to watch Gina K's video on Stamp TV here.

I have very few solid stamps that I could use with this technique so I turned to the Bold Flowers set from Gina K. I "kissed" up this thank you card using the kissing technique on all 3 flowers...

It's hard to see in the photo but the background is sponged with blue, pink and a touch of purple plus some brown sponging at the earth layer just under my textured torn paper strip. I used the Nested Sentiments nestabilities to create the sentiment flag. An orange jeweled brad and a stamped butterfly from MTME finished off the card.

It's time to pop over to the team to see what they have in store for you today then get out your supplies and start kissing! Can't wait to see what you create.

♥♥ Just Us Girls Design Team  ♥♥

♥♥ Be sure to stop and visit our Featured Designer for the month ♥♥

Have a great weekend. Unfortunately this is one of those weekends where I must go back in for a few hours - we're doing some Strategic Planning.

Friday, April 8, 2011

Wishing You Sunshine

It's a Just Us Girls Saturday and time for a technique challenge. Maria is our hostess and she has chosen the baby wipe technique for this week. Here is the LINK to a tutorial on SCS but there are others out there as well.

I had never done the baby wipe technique like the SCS tutorial shows. I had done a completely different version as shown on Stamp TV. However, being true to Maria's challenge I thought I'd try this new way. Boy did I have trouble. NOT with the technique - it's super simple but rather with the final card. I won't bore you with details and I'm not overly thrilled with the end result - let's just say I was just DONE!


Used Scattered Showers from PTI as my stamp set - you can see that I stamped three umbrellas from my one baby wipe. Cut the umbrellas out and mounted them with dimensionals for depth. Added a simple sentiment for someone who's a bit "blue" right now. Some Rain Drops as embellishments and I called it good to go.

Here's a closer look at the babywipe technique - it's hard to tell but I used 4 colors all from SU! soft subtles.


Please stop by this month's Featured Designer, the talented Teresa Kline and then pop over to the rest of the JUGS team.
♥♥ Just Us Girls Design Team  ♥♥


Thanks for stopping by - hug the ones you love and have a great weekend. Thanks for all the sweet notes during my MIA time. :-)
Hugs n Smiles.

Friday, March 11, 2011

Just Smashing!

NOTE to my followers: I will be MIA for a couple of weeks. My daughter is back from her assignment in Germany and is coming home for a week as she prepares for her deployment to Afghanistan - I will then be going to DC to help her finalize her plans and will then drive her car back here once she leaves. I want to spend every possible free moment with her before she goes so I hope y'all understand and check back on me soon. Here's a quick post for the JUGS.   Try it--- You'll Like it!

Good morning - it's a JUGS Saturday - are you ready for a fun technique? Today's challenge is to use the acrylic smash technique which you can find HERE from SCS.


I had never tried this technique before and, although I used to do a lot of tole painting, I could not find my old acrylic paints. I had one bottle of cream on hand so I simply added a few drops of re-inker ink to a small pool of acrylic, stirred it up and sponged it on my acetate layer.

Here's my sunrise thank you...


I used a light pink, soft yellow and a pale purple for my three colors. I had stamped my acetate with a few pieces from the Tropical Flowers set from Gina K. The rest was just a simple design - a little embossing, a couple of prima flowers and a few purple pearls.  I really liked this technique and will surely use it again!


Please check out the rest of the team's creations and I will "see" you soon.

♥♥ Just Us Girls Design Team  ♥♥

♥♥ Be sure to stop and visit our Featured Designer for the month ♥♥


Thanks for stopping by.
Hugs n smiles,

Saturday, February 12, 2011

Spotlight on JUGS

You still have a chance for some blog candy in honor of my blogaversary so stop over and check it out HERE.

Hi all - today is our Technique Challenge at Just Us Girls - we have a great technique for you this week - it's called Spotlight and you can find a great tutorial about it on SCS by clicking here.
I turned to one of my favorite (but discontinued I think) Stampin Up! stamp sets called Toile Blossoms for this card. A simple birthday card but isn't it fun how the colors just POP in that little spotlight circle??

Papers are Ripe Avocado and Plum Pudding from PTI. A couple of MS punches and a strip of Bitty Dot paper also from PTI provided me accent border strip. A snippet of ribbon and some pretty purple pearls (boy say that three times fast!) and I was done.  Here's a look at the detail of the spotlight coloring:

Hope you will try this cool technique and play along with us this week. Be sure to stop by our Featured Designer Lori Kalus this month and visit our very talented Design Team members (in my side bar ->).

Thanks, as always, for stopping by! Have a funtastic weekend!
Hugs n Smiles.

Friday, January 7, 2011

Envy of the Envelopes! Make a good first impression!

Hey JUGS fans - it's time for a fabby fun technique challenge brought to you by the Just Us Girls team. I am your hostess so I really hope you enjoy this week's challenge.

This week's challenge is called Envy of the Envies (envelopes that is!) We often put a lot of work into our beautiful card creations then pop them into a plain envelope and send them off. Well, I thought this week it would be fun to put some extra effort into making those first impressions (the envelope) just as special as the card inside.

Here's the 3 part challenge 
  1. Make a card – no specs on this but if you have Gina K stamps we'd LOVE to see them!!
  2. Decorate your envelope to match/coordinate with your card and
  3. Finally, for this challenge we also want you to create a liner for your envelope to coordinate with your card. If you don't know how to make a liner please refer to this tutorial on Stamp TV. Gina K shows you just how to do it!http://stamptv.ning.com/video/lining-your-envelopes
Be sure to show us both your card and your envelope! Here's mine.  In this one you see the front of my envelope decorated to match my card.

My card was made with the FABULOUS stamp set from Gina K called Lovely Labels 2. This set was designed by Nina Brackett and coordinates with Nesties Labels 14, Labels 15 and Labels 16. The stamp images are some of my all time favorites. I inked up the large frame image in Ripe Avocado ink and stamped on Gina K's Pure Luxury Ivory CS then cut it with the largest Nesties 16 die then I inked up one of the smaller curved images, stamped and cut it with one of the Nesties 14 dies. I also stamped the Merci sentiment onto this layer.

The patterned paper is a Gina K digital paper set called Bright and Grungy Dots. I LOVE polka dots so I had to have this paper and it's just lovely. I made my liner from the dots paper too and I was tickled with the results - Looks SO professional and fun!!!

Here's a look at the inside of my card. I wanted the entire card to be coordinated and fun. The swirly image is from the same Lovely Labels 2 stamp set.

Below is a close up of the two stamped images.  The top most layer is popped up on dimensionals over the Labels 16 larger frame image. (I stamped the word Merci in the small frame - Merci is also a sentiment in the set.) Finally I added some ivory lace and a shabby bow made from vintage seam binding from the wonderful Debbie Marcinkiewicz!


One more look...

Now that you've seen mine, please slide on over and visit our Design Team gals  - they have worked hard to bring you some good ideas.  We will be giving away a Gina K stamp set to one lucky randomly selected participant who follows all of the challenge requirements so get stampin' and make a FABULOUS first impression with your awesome envelopes!

♥♥ Just Us Girls Design Team ♥♥
Be sure to also stop and visit our Featured Designer for the month... I know she has some wonderful eye candy to share as well! (She's a long time Gina K fan too!!)
Carla Suto


Have a great week. I'll be doing my best to comment on your creations but I'll also be traveling so bear with me if I don't get to you right away. I''ll have limited Internet access.  :-(

Hugs n' smiles,

Friday, November 12, 2010

Gate Fold JUGS Challenge

Hi gals, today's Just Us Girls technique challenge is to make a gate fold card. If you've never done one before there are several tutorials to help you. Beate Johns has this tutorial for you or you might want to check out Gina K's video on StampTV how to make a Gate Fold card --- With a Twist. (There are two elements on the card - one on each "flap" of the card)

My card follows the StampTV tutorial to make the card "with a twist" so I made a card for my dear friend for Thanksgiving. I think he and his wife will like it :-)


I used some GinaK Pumpkin Spice card stock as my base then inked up Theresa Momber's Autumn Beauty stamp set. I colored the images with copics - and cut a slit in the wagon so I could slide the pumpkins "into" the wagon.

The DP is from Autumn Abundance (PTI) - the plaid makes such a perfect masculine base!  I also used it to decorate the inside as well. The sentiment on the inside comes from Gina K's So Grateful set.

And now - a special little treat --- Dana has a birthday this week so I want to shout out to her HAPPY BIRTHDAY girlie! Hope it's one of your best ever. I had already made my Gate Fold card when I realized it was Dana's BD so my card is not a BD card :-(  but the birthday wishes are there all the same - BTW I am putting a real BD card in the mail to you Dana - be on the lookout!

Please stop by Dana's blog and wish her a happy birthday then pop over to the rest of the team (sidebar ->) and check out their creations as well. We are also delighted to have a new Featured Designer for November - the very talented Cheryl Rowley - leave her a little love as well if you can.

Hugs n Smiles!

Friday, September 10, 2010

Cracked Christmas


It's technique time with Just Us Girls and today we're challenging you to try the Cracked Glass technique on your project. It's SUPER cool and makes a really wow focal image!

Here are a couple of links to tutorials.
The one from Gina K on StampTV is a video where Gina shows you just how easy it is to do this and
Beate Johns does a great step by step AND video on Splitcoaststampers site as well. 

This week's challenge is being sponsored by JustRite Stampers! (and they have a WOWZA prize package to offer too!!!) We are SO tickled that they have enjoyed the JUGS team efforts and they graciously asked us if they could sponsor us again (how could we say no to such a great company?!?!).  JustRite asked us each to make a Christmas project so get ready to be inspired for the holidays!!!


I am just in love with JustRite Stamper's new Christmas Ornament 3-1/4 set. Probably because I grew up with this style of tree ornament and they were usually made from delicate but beautiful glass.  I opted for very traditional colors on this one. I started by embossing my ornament and circular border with fine gold embossing powder. I then colored with Copics (JustRite now carries Copics in color-coordinated sets) THEN I went to work to make the cracked glass. You can't really see the gold embossing here but it's there IRL.

I was totally thrilled with how wonderfully mine "cracked".  (But remember if you don't like your crack pattern you can reheat and cool and crack again!)  I also used a bit of distressing ink to add to the vintage look of the cracked glass and I used it on my vanilla CS for a vintage flair as well.


An easel card was the perfect way to show off this beautiful new sentiment from the stamp set called Christmas Nested Sentiments and Verse. I love this sentiment because I believe that it IS the amazement and wonder of children that is part of what makes Christmas so special. The frame around it is the larger of the two frames from Victorian Nested Frames. I simply stamped with Gold ink (SU!) and then embossed with the same fine gold embossing powder that I used on the ornament. I added an organdy bow and some red pearls as accents to finish off the project.

I really, really hope you will try this technique. I was a little scared when I first did this several months ago but it's SUPER easy and really kind of fun. In fact, here's a link to a photo of my first cracked glass project.

I hope you will pop over to the JUGS DT (in my sidebar) and see what they have created - It IS all it's cracked up to be (tee hee a little punny humor).  ALSO stop by our Featured Designer Lynn Mangan and leave her a little love, too.

OH YEAH.... JustRite is offering a SWEET prize package to one lucky winner.....

The prizes will be: (so you WILL want to play along!)

2 JustRite Christmas Collection stamp sets of choice
2 JustRite coordinating stampers/mounts
5 Copic Sketch markers of choice, from JustRite’s offering
2 Memento full-sized ink pads of choice

In case you don't know too much about JustRite here's a little info...
JustRite Stampers has a huge collection of Christmas and holiday stamp sets from which to choose.  Their entire collection can be viewed here.  They also offer the full line of Memento full-sized ink pads and now a selection of 96 expertly-chosen Copic Sketch markers which may be purchased as singles, trios or quads!  The number one question people have about Copic markers is which colors will work together nicely to give a great shading of color.  Now the JustRite design team has done all the work for you -- their quad and trio sets are designed so that you can be assured they will work together to give you a perfect blending group! JustRite has a great 2-page reference guide you can download her.

NOW - before you get busy, take a peek at the Design Team cards. (In my sidebar) They are going to thrill you as well.  ALSO - be sure to stop and see the beauty Lynn Mangan has for you this month. Lynn is our Featured Designer for this month.

Thanks for stopping by - I look forward to seeing YOUR projects too!!!

Hugs n Smiles.

Friday, July 9, 2010

Crazy Backgrounds - JUGS Technique

Before I start let me shout HAPPY BIRTHDAY to our Design Team member Kathryn - her birthday is on Monday but we wanted to give her a big ***Birthday Wish*** today. Please stop by her blog and leave her a little birthday love!

Ink - Spray - Smash! Ever heard of it? Well you will want to join the Just Us Girls challenge this week and participate in this fun technique. There is a tutorial on SCS that you can find HERE on how to do this but really - the name says it all!  Maria is our hostess this week and she has given us our assignment... fun challenge Maria!

Here's a piece of my paper after I inked, sprayed and smashed but before I used it on my card. I used Lavender Moon, Aqua Mist and Sweet Blush reinkers for this background.  I also sprayed with alcohol instead of water. (That's how I had learned the technique - don't honestly know if it makes a difference in the outcome? - If anyone can tell me please let me know)


SO I took a piece of this background and turned it into this card -->


I seem to be enjoying square cards lately. I used Aqua Mist CS for the main card and one of PTI's polkadot embossing dies BUT it's still not wide enough to do a 5" square so I used my scor-pal to score the left edges with straight lines - I rather like how it turned out. (Don't cha just love serendipity!?)

I also punched out a couple of MS butterflies from the same glossy BG paper I had made - a really pretty effect I think. Since this is for a friend going through some rough times I just wanted soft, feminine and pretty.

A closer look at these two sentiments from the JustRite HOPE Borders and Centers set.  I combined TWO sentiments - one for the border and one for the center because I was focusing on the messages here.

I also inked up another piece of glossy CS in an entirely different color pallet - Always Artichoke, Bravo Burgundy and So Saffron for a more manly color scheme. Although I have not yet made the card here is how my BG turned out. Won't that make a fun masculine card?

I really hope you'll get inky (literally) with us this week and play along.

Pop over and see what our Featured Designer, Debbie M created for us and also the projects from the rest of the team.

♥♥ Just Us Girls Design Team (minus a couple on vacation)  ♥♥

Have a great weekend!
Hugs n Smiles,

Friday, June 11, 2010

Let's Get Digital with Just Us Girls

Its time for Just Us Girls - this week it's a technique challenge and I am the hostess. I decided it was time to really have us all try some digital stuff! Digital stamps and digital scrapbooking are becoming quite popular.  Lauren Meader from My Time Made Easy is sponsoring us and she will be giving away a DIGITAL STAMP SET plus a pack of DIGITAL PAPER to one lucky participant this week. SO it would be good to play along...

Here's my project for the week.  I realize the layout is really, really simple but I'll explain all the digi action in a bit.


The card itself is mounted on Gina K 120lb pure luxury CS (love this CS) layered with Spring Rain and another layer of white.  The white layer behind the house has been embossed with the woodgrain embossing plate from PTI. It really adds some cool texture! I used my Scor-Pal to do some simple scoring on the blue layer and on the CS base layer. If you click the picture to enlarge it you will see what I mean.

Here's a closer look at the main image:


I have not played a whole lot with digital images (I really prefer "real stamping") but I've been exposed to enough of them to think it was worth doing some exploration. SO I started with one of Lauren's images (the house) from the digital set called Just For You. First thing I did was enlarge the image to almost 3". It was just a transparent house when I first started...


Then I began to play with the image in Photoshop. I wondered if I could "paper piece" a digital image. I discovered that I could, indeed do some creative paper piecing - so I used some of my favorite papers from MTME and "pieced" my little house... I also "painted" the scalloped edge of the roofline, too. Hmmm this was kind of fun (although it took me about 45 min to get this far - I had to learn as I proceeded). I will tell you that each digital paper was on a separate layer so if I messed up I didn't ruin the whole image :-)


After that I added some flowers from the same Just For You set, painted them (in Photoshop) with kind of fun colors - oh I decided I needed the bird, too.  I was now to here:


Each flower is on its own layer as is the bird. I ended up with 10 layers total in my Photoshop file!! If you look closely you will see that I added a DROP SHADOW to each flower and the bird to give them more depth and dimension and to appear "popped up".  Last thing I did to the image was to add my sentiment text right on the house since I wasn't sure if there would be room on the card when I was done.  I simply added a text layer in PS and typed the words Welcome Home and placed the text just above the door - I used the arched text tool to make the words arc slightly over the door.  Ok - I finally had my image complete. It was very rewarding to be able to figure out all the steps along the way and yet to have a card that LOOKS like lots of layering that's not at all. Once I printed my image, I cut out the house, colored the windows with a soft yellow to look like a light shining in the window,  then mounted it to the rest of my card with some dimensionals.

You will notice from my screen shots above that the color on my screen was more "teal" than the card - that's the color change that happened between what I saw on my SCREEN and what printed on my PRINTER! (ACK!) I didn't have time to do any color tweaking but I could have if I really needed to.

SO - I spent about 2 hours playing with digital images and layers and Photoshop - You could do the same things with Gimp which is FREE photo editing software.  It took me way longer than a "normal" card would have BUT I learned a LOT along the way. I will surely visit digital "stuff" more often after this -

I HOPE you will all TRY some digital image stuff - it CAN be frustrating if you don't know what to do but really, it's a lot easier than you might think - Even if you just use a digi image and RESIZE it you'll find some real value in that ability.

Be sure to pop over to the rest of the team and see their creations - their cards and layouts are WAY better than this simple layout - I devoted most of my time this week to learning more about digital and left too little time for a fancy layout.

Now - before I go I must bid a FOND FAREWELL to my teammate and fellow JUGS gal, Mona. This will be Mona's last JUGS challenge as a DT girl - she is already way committed with other things on her plate and she will also be exploring new options and avenues. I will miss her dearly - I love her shabby chic vintage style and she was SO good about commenting and leaving a little love - be sure to stop be her blog and leave her a few good wishes. All the best to you Mona, my friend! :-(

Thanks for stopping by and putting up with all my blabbering on :-0 Tomorrow is the next wedding dress fitting - it's getting closer now - I need to have my own Mother of the Bride dress altered too - better get on that.

Have a lovely weekend.
Hugs n Smiles.

You Might Also Like...
Related Posts with Thumbnails