Hey girls! It's Saturday and I am your hostess this week for Just Us Girls sketch challenge. Easy peasy right? Here's the sketch.
And here's my take on the sketch. I was very straight forward with my interpretation of the sketch today.
I used some new digi paper from My Time Made Easy as my starting point and inspiration. The brown and yellow paper is from the set called Bee Mine. I inked up my cuttlebug folder with Chocolate Chip ink and ran the yellow paper through. The rest of the card was just layering. The images are from Bee-Loved by MTME also - the bee is just too cute - his wings are glittered with Dazzling Diamonds. The sentiment is from MTME's Sentimental Occasions.
Next up I decorated the inside - I wanted to "cover" up the ribbon on the inside so I used the same digi paper on the top half of the inside.
Now swing by and visit the rest of the design team. (In my sidebar) then get sketchy with JUGS. I can't wait to see what you come up with.
Finally, I'd like to wish a sincere and warm Happy Mother's Day to all of you who are moms. It's a difficult day for me since I lost my mom 9 years ago - Mother's Day just hasn't been the same since. I'm looking forward to spending time with my DH, daughter and son-in-law though. If the weather cooperates they are taking me geocaching - now that's a dedicated family!!! Willing to spend a day with mom doing what mom loves! Love it.
Hugs n smiles all.
Contentment is not the fulfillment of what you want but the realization of how much you already have. ~Anonymous
Showing posts with label MTME. Show all posts
Friday, May 6, 2011
Wednesday, May 4, 2011
A Year in Review MTME
It is with a heavy heart that I share with you today that this will be my last post as a member of Lauren's amazing team. If you've been following my blog you'll know I've had some changes in my life and after serious and prayerful contemplation I decided it was time to step down from the My Time Made Easy team. With my children spread far and wide around the world I will be doing a lot more traveling to visit them. I also have a very stressful and demanding job and I just need time to be me with no pressure, no deadlines and no commitments. I have been SO richly blessed by this experience and must say a special thank you to Lauren - she snagged me two years ago to be on her challenge team and then on her MTME design team. Lauren believed in me long before I believed in myself and the support from all of my loyal followers has made it a fantastic experience. I'll still be on JUGS and still be stamping and blogging - just not as part of Lauren's team. I wish Lauren and her company the absolute best and to my teammates - YOU GIRLS ROCK - you're the best! You are an incredibly talented and caring group of women and I have been so blessed to have worked with all of you. Thanks for everything. OK - my tears are shed - let's get on with today....
Today is the final group post from the My Time Made Easy team for the May release. As has been our practice, we end each release with a Year in Review - or a look back at favorite templates, stamps and/or paper from previous months. Lauren has so many wonderful templates to choose from but I chose this one because it truly is one of my favorites. It's called Pick of the Petals.
Here's a peek at the top - I embellished it with primas and some cut leaves from a MTME cut file called Petal Perfections and some ribbon from my stash.
To finish off the front of the template I used a line of pearls and some beautiful blue rhinestones. No matter what I did I could not photograph the rhinestones and get their true blue color but they are very pretty.
Here's my card made to match. I know we usually go back and use paper from past releases for the Year in Review but this one is brand new and I LOVE it so I just had to use it. The tulips and the bee - just SO springy! This comes from the über talented Kristin and is from the Bee Mine digital paper set, new this month. The sentiment on the card comes from one of my favorite sentiment sets called Just For You.
A final look at the entire gift set. I just got a new camera and the colors are so off - UGH - sorry - I can't figure out - with flash is too much without it's too dark. Argh!
I didn't show you the inside of the box because I don't want to spoil the surprise for my friend who's getting this next week! :-)
That's all for now folks. Thank you again for your supportive and encouraging comments about my My Time Made Easy projects on my blog - you always make me smile and I appreciate your sweet words more than you know. I'll be around - stay in touch please.
Hugs and smiles and a few tears today as well,
Monday, May 2, 2011
Barrow of Blooms!
Good morning - are you just loving this month's My Time Made Easy products? I think Lauren and Catherine and Kristin have truly outdone themselves - again! This time I'm showcasing a second template called Barrow of Blooms.
I started with some avocado card stock and cut my template then layered it with one of this month's newest digital paper from a set Kristin called Buzz-y Blooms. I LOVE it - the daisies are so fresh and fun!
Now here's a peek at what I packaged up for this sweet set (my title is a hint!) I packaged up a large selection of prima flowers in a tin with a see-through lid. Some ribbon another button and some additional twine and my gift set was ready.
And it fits perfectly inside the Barrow!!! How's that for a great way to give a fun gift?!?
I started with some avocado card stock and cut my template then layered it with one of this month's newest digital paper from a set Kristin called Buzz-y Blooms. I LOVE it - the daisies are so fresh and fun!
Here's a look from the other side. I embellished the cute wheelbarrow with some ribbons, buttons and twine! The centers of my wheels are punched from the same paper - it's the centers of the daisies. I also lined the INSIDE of the wheelbarrow with the same designer paper.
And it fits perfectly inside the Barrow!!! How's that for a great way to give a fun gift?!?
Of course I had to have a card (I actually made this same card for Lauren's Birthday - see the MTME Blog for our Happy Birthday to Lauren Hop!!!) featuring a variety of stamps from this month's Bee-Loved Sentiments and Bee-Loved stamp sets.
Here's a final look at the whole gift set. A really, really cute template - lots of great uses for this adorable gift set.
Be sure to stop by and visit Tangii, Lauren and Catherine today to see what they have cooked up for you.
Hope your week is going well!
Hugs n Smiles.
Saturday, April 30, 2011
Cards For My Bee-Loved
It's release Day with My Time Made Easy - YAY!!! Time for some great new products and you're going to love them. Today the team is sharing ideas with you featuring the newest stamp sets designed by Catherine Doucette called Bee-Loved and Bee-Loved Sentiments.
I created a set of four cards for a friend of mine. I think she'll like the variety. I'll have to make another one of the "Missing my Honey" to send to my son.
I featured images from the Bee-Loved set and sentiments from Bee-Loved Sentiments - aren't these just perfect for spring?!? Here are close ups of the individual cards. I used a similar set of elements but unique images on each one.
Please be sure to stop over to the rest of the team. All the girls have some wonderful projects to share - you won't want to miss them!
Supplies from My Time Made Easy LLC:
Hugs n Smiles,
I created a set of four cards for a friend of mine. I think she'll like the variety. I'll have to make another one of the "Missing my Honey" to send to my son.
I featured images from the Bee-Loved set and sentiments from Bee-Loved Sentiments - aren't these just perfect for spring?!? Here are close ups of the individual cards. I used a similar set of elements but unique images on each one.
Please be sure to stop over to the rest of the team. All the girls have some wonderful projects to share - you won't want to miss them!
My Time Made Easy Design Team:
Pretty Impressions © Stamps: Bee-Loved, Bee-Loved Sentiments
Hugs n Smiles,
Friday, April 29, 2011
Wedding Cake Made Easy!
Greetings all. It's sneaky-peek time from the My Time Made Easy team. We're gearing up for an awesome pre-summer set of beautiful goodies. I'm starting today with a brand new template called Oh Bee Hive! Yes - it's an adorable bee hive template - BUT WAIT - it can also be a cake! Now how cool is that? My daughter's best friend is getting married and the girls are looking for decoration ideas so I decided to make and decorate this template as a wedding cake.
I started with some stunning cardstock from the Paper Temptress - it's my favorite "fancy" wedding CS - called Laser Luster (I think). I created my cake from the cardstock then I set about decorating. I started with some pearls on a strand - colored each strand with copics and glued to the cake with Zip Dry. I used a flower from Hobby Lobby as my cake topper then filled in with yellow and white tiny flowers. I think the girls would prefer all yellow flowers on the layers- I just didn't have enough to do the entire cake this time. If they decide to use this idea obviously we can buy plenty of tiny flowers to decorate with.
Here's a view looking down on the cake.
A close up of the flower from HL - it was in the wedding section and was $.99! They often go on sale so it would be an inexpensive alternative to making your own paper flowers if you are short on time (which I was).
Please hop over to my fellow team mates, Monique Hansen and Debbie Marcinkiweicz as they both have some absolutely DELICIOUS ideas to share with you as well.
See you again tomorrow for our group post for the May release for My Time Made Easy.
I started with some stunning cardstock from the Paper Temptress - it's my favorite "fancy" wedding CS - called Laser Luster (I think). I created my cake from the cardstock then I set about decorating. I started with some pearls on a strand - colored each strand with copics and glued to the cake with Zip Dry. I used a flower from Hobby Lobby as my cake topper then filled in with yellow and white tiny flowers. I think the girls would prefer all yellow flowers on the layers- I just didn't have enough to do the entire cake this time. If they decide to use this idea obviously we can buy plenty of tiny flowers to decorate with.
Here's a view looking down on the cake.
A close up of the flower from HL - it was in the wedding section and was $.99! They often go on sale so it would be an inexpensive alternative to making your own paper flowers if you are short on time (which I was).
A final peek at the cake with the two champagne glasses to give you a sense of scale. Since I cut this with my cricut it would be EASY to rescale it larger if needed. I was able to cut 3 side pieces per sheet of cardstock but I could have scaled it way up and cut ONE side piece per cardstock for a much larger cake) but I rather like the mini version. You can go wild with decorating this adorable cake - for weddings, for bridal showers, for baby showers or even for a birthday! AND don't forget - Lauren will also show you how this makes up into a cute, cute, cute little bee hive!
Please hop over to my fellow team mates, Monique Hansen and Debbie Marcinkiweicz as they both have some absolutely DELICIOUS ideas to share with you as well.
See you again tomorrow for our group post for the May release for My Time Made Easy.
Friday, March 4, 2011
SURPRISE - A Year in Review
Saturday greetings to y'all. I have TWO posts today so be sure to catch them both - the other post is for JUGS!
For today's post I'm using one of the templates from My Time Made Easy called In Suspense. It was released back in October - just in time for the fall holidays and I really enjoyed it. With St. Patrick's day quickly approaching I decided this would be a fun template to bring out again for a special someone. ;-)
I kept it simple and straightforward - no card this time because it's just going to be sneakily placed on someone's desk...
I started with some green SU! paper and cut the template with my Cricut but I eliminated the cut out "window" from the front and the circle for the door knob from the back piece - I want this to stand on a desk - not hang on a door. I created some accent pieces using the Amazing Argyle stamp set - thought that the "flower" looked sort of like a clover! A simple bow and button just for a bit of fun at the closure edge.
I then used the Secret Surprise cut file (in two layers) and stamped it up with a couple of the sentiments from the A Secret Surprise stamp set and another couple of flowers from Argyle Amazement.
Finally, I used one of my favorite cut files called Cornice Trimmed Circle. I created an extra layer to add the pop of orange. The words come from the A Secret Surprise stamp set - it's one long sentiment but I just inked it up half and half to stamp it into the circle.
My colors were inspired by the gift inside the box - a pair of fun socks for St. Patrick's Day. I promise that the green in the socks is much closer to the paper IRL. Don't know why my camera was giving me fits but it looks good in person. The argyle pattern in the socks and the touch of orange was my source of inspiration. I hope the lucky recipient likes them :-)
Time to pop over to the rest of the team and see some great ideas using templates and stamps from this past year. Fresh new ideas for you!
Supplies from My Time Made Easy LLC:
Hugs n Smiles.
For today's post I'm using one of the templates from My Time Made Easy called In Suspense. It was released back in October - just in time for the fall holidays and I really enjoyed it. With St. Patrick's day quickly approaching I decided this would be a fun template to bring out again for a special someone. ;-)
I kept it simple and straightforward - no card this time because it's just going to be sneakily placed on someone's desk...
I started with some green SU! paper and cut the template with my Cricut but I eliminated the cut out "window" from the front and the circle for the door knob from the back piece - I want this to stand on a desk - not hang on a door. I created some accent pieces using the Amazing Argyle stamp set - thought that the "flower" looked sort of like a clover! A simple bow and button just for a bit of fun at the closure edge.
Finally, I used one of my favorite cut files called Cornice Trimmed Circle. I created an extra layer to add the pop of orange. The words come from the A Secret Surprise stamp set - it's one long sentiment but I just inked it up half and half to stamp it into the circle.
My colors were inspired by the gift inside the box - a pair of fun socks for St. Patrick's Day. I promise that the green in the socks is much closer to the paper IRL. Don't know why my camera was giving me fits but it looks good in person. The argyle pattern in the socks and the touch of orange was my source of inspiration. I hope the lucky recipient likes them :-)
Time to pop over to the rest of the team and see some great ideas using templates and stamps from this past year. Fresh new ideas for you!
♥♥♥♥♥
My Time Made Easy Design Team:
Lisa Kind
Tangii Crain
Debbie Marcinkiewicz
Monique Hansen
AND our special Guest Designer this month, Kathryn Berthiaume!
Tangii Crain
Debbie Marcinkiewicz
Monique Hansen
AND our special Guest Designer this month, Kathryn Berthiaume!
Pretty Packaging Templates: In Suspense
Pretty Impressions © Stamps: Argyle Amazement, A Secret Surprise
Pretty Pieces © Cut Files: Secret Surprise, Cornice Trimmed CircleHugs n Smiles.
Wednesday, March 2, 2011
What's Your Angle - MTME
Ready for another fabulous template from My Time Made Easy? This one is spectacular and you are going to love it. It's called What's Your Angle - it's super roomy and it's fun to make!!
I started out with Cranberry Tart CS from Gina K then I worked in some of Kristin's fabulous new digital papers this month called Cheerful Chirps. I used the Abra-Bow-Dabra cut file to make a paper bow on top but then I also tucked in a ribbon bow and prima to finish it off. I also used one of my favorite new cut files called Cornice Trimmed Oval on the box and card. I LOVE this cut file - it makes such a beautiful label. The stamps are from the new Keep Strong set - it's filled with wonderfully encouraging sentiments!
Here's a side view of the box.
A view from the top - you can see I nestled a bow and prima in with the paper bow from Abra-Bow-Dabra.
A peek inside the box. There is a large bag of potpourri inside here :-)
Gorgeous new stamp set called Keep Strong - I LOVE this sentiment called Friend.
Here's the card I made to go with the template. Used the same digital papers and the same stamp set Keep Strong - different sentiment this time.
Don't you love this sentiment? I will be using this a lot I'm sure :-)
A final look at the gift set. I think the recipient is going to love it.
Be sure to stop by and see what Lauren, Monique and our guest designer Kathryn have for you today!
Thank you for stopping by - your sweet comments and words of encouragement make my day!!
Hugs n smiles,
I started out with Cranberry Tart CS from Gina K then I worked in some of Kristin's fabulous new digital papers this month called Cheerful Chirps. I used the Abra-Bow-Dabra cut file to make a paper bow on top but then I also tucked in a ribbon bow and prima to finish it off. I also used one of my favorite new cut files called Cornice Trimmed Oval on the box and card. I LOVE this cut file - it makes such a beautiful label. The stamps are from the new Keep Strong set - it's filled with wonderfully encouraging sentiments!
Here's a side view of the box.
A view from the top - you can see I nestled a bow and prima in with the paper bow from Abra-Bow-Dabra.
A peek inside the box. There is a large bag of potpourri inside here :-)
Gorgeous new stamp set called Keep Strong - I LOVE this sentiment called Friend.
Here's the card I made to go with the template. Used the same digital papers and the same stamp set Keep Strong - different sentiment this time.
Don't you love this sentiment? I will be using this a lot I'm sure :-)
A final look at the gift set. I think the recipient is going to love it.
Be sure to stop by and see what Lauren, Monique and our guest designer Kathryn have for you today!
Thank you for stopping by - your sweet comments and words of encouragement make my day!!
Hugs n smiles,
Monday, February 28, 2011
MTME - For the Birds
Hi all. Welcome to MARCH - does that mean that winter is ALMOST over??! Well, it's time for the group post from the My Time Made Easy team and we're all showing you ideas made with one of the newest stamps set called Singing Silhouette.
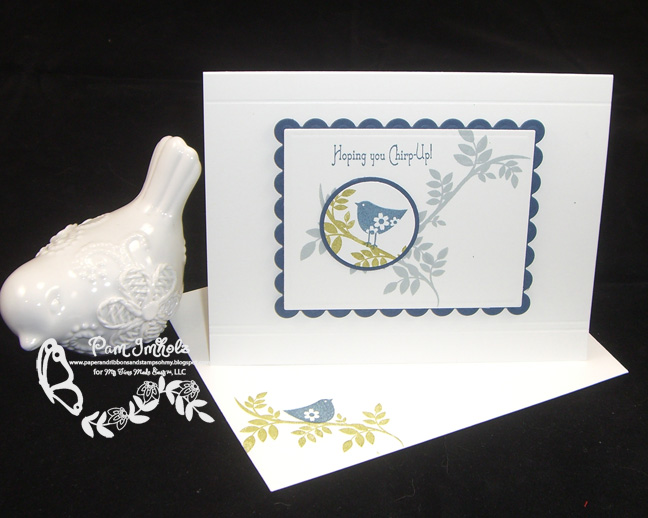
I started out by making a set of four cards using the stamp set. Each one is different so it's makes a nice variety of cards. I kept the design CAS so I could easily reproduce these in quantity. I kept to the same color palette too. I matted each with a nestie rectangle and then did some simple Scor-Pal scoring above and below the rectangles.
I then needed a cute way to package up these cards. I chose the Tote-All package. It's roomie enough for a set of cards and cute as a button to boot! I stamped the flap with some of the same stamps. I added two buttons and some twine for closure but you could also use velcro or magnets.
Following is a picture of each card with its matching envelope.
And finally just a quick pic of the inside of the template so you can see how the cards just tuck in neatly.
Ok - scoot on over to the DT and see what lusciousness they have created for you. Thanks SO much for stopping by to see what I had on tap for ya.
Supplies from My Time Made Easy LLC:
Hugs n Smiles,
I started out by making a set of four cards using the stamp set. Each one is different so it's makes a nice variety of cards. I kept the design CAS so I could easily reproduce these in quantity. I kept to the same color palette too. I matted each with a nestie rectangle and then did some simple Scor-Pal scoring above and below the rectangles.
I then needed a cute way to package up these cards. I chose the Tote-All package. It's roomie enough for a set of cards and cute as a button to boot! I stamped the flap with some of the same stamps. I added two buttons and some twine for closure but you could also use velcro or magnets.
Following is a picture of each card with its matching envelope.
And finally just a quick pic of the inside of the template so you can see how the cards just tuck in neatly.
Ok - scoot on over to the DT and see what lusciousness they have created for you. Thanks SO much for stopping by to see what I had on tap for ya.
♥♥♥♥♥
My Time Made Easy Design Team:
Lisa Kind
Tangii Crain
Debbie Marcinkiewicz
Monique Hansen
AND our guest this month --> Kathryn Berthiaume!
Tangii Crain
Debbie Marcinkiewicz
Monique Hansen
AND our guest this month --> Kathryn Berthiaume!
Pretty Packaging Templates: Tote-All
Pretty Impressions © Stamps: Singing Silhouette
Hugs n Smiles,
Subscribe to:
Posts (Atom)