Showing posts with label Baby. Show all posts

Friday, February 25, 2011

Treasure Chest - Animal Kingdom

It's time for another blog hop from the Gina K CSS alumni team. Carolina has come up with a new theme called Treasure Chest - this month's treasure chest is a tribute to the Animal Kingdom and we were each asked to create a card or project that features one of Gina K's animal sets.

You should have arrived at my blog from Meisje's blog. If so, you are on the right path. If not you can start at the Stamp TV main page and start from the top.

I chose the Whatever Floats Your Boat stamp set and made this little baby card.


I punched out my sets of squares from Gina K Spring Colors CS in the blue and pink. I adhered them to Pure Luxury Chocolate base weight CS - then I ran that whole layer through my Swiss Dots CB embossing folder.

The focal point of my card is the sweet giraffe image which is matted with several layers and then popped up on dimensionals.  I bent the "window" up for a 3D effect - and tucked the sentiment flag under the giraffe layer.   I added a few pearls for an accent. I'm sorry I don't remember where I saw this layout but I thought it was perfect for my card.


Make sure to leave a comment as you hop along because on Tuesday morning (March 1st), we will randomly choose one of the comments from all the blogs and that commenter will get a stamp set of their choice valued up to $24.95!

It's time to HOP along to Peggy Weiman's blog.

Thanks for stopping by - your comments are always encouraging and you make my day!!!
Hugs n Smiles,

Monday, February 21, 2011

Challenge Crazy!!

Wow I got some time to play and play I did! I have so neglected my dear StampTV friends and challenges so I jumped in on those and, finally I also got to play along with CR84FN this week too. Here are the cards I worked up:

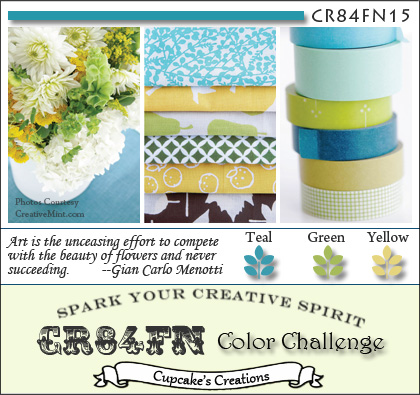
1st - for the February Color Challenge at Stamp TV - a nestie shaped card that swivels open - colors green, yellow plus one neutral. Stamp set Oh Baby bu Gina K Designs.


2nd - The February sketch challenge at StampTV - LOVED this sketch - so fun. Stamp set Spring Florals by Gina K.


3rd - String it up - no ribbon challenge - Stamp set Autumn Beauty by Gina K plus sentiment from Tag Lines.

Finally - I combined this week's Mojo Monday sketch with Mona's CR84FN color challenge - the gray was a bit of a stretch for me but I got there.
 
JustRite stamp set Stitched With Love and Nested Sentiments.


I was quite happy in my creative "space" this weekend and today's holiday! Thanks for popping in.
Hugs n smiles and have a GREAT WEEK!

Monday, February 14, 2011

Oh Baby!

I had fun playing along with last week's CR84FN Color Challenge brought to us by the extremely talented and very sweet Mona Pendleton so I decided to try it again.  I wanted to make a "gender neutral" baby card and thought these colors would work well.  I combined this week's CR84FN colors with Mojo Monday sketch.


+

=

 Stamp set is from Gina K Designs and is called "Oh Baby!" Love these little ducks.


Thanks for stopping by. Have a wonderful week! See you later for a JUGS color challenge.

Hugs and smiles.

Thursday, November 4, 2010

Baby Girl Gift Made Easy

Well, we're winding down the November release for My Time Made Easy and I've got something pink and precious to share today. Be sure to also stop by and see Lauren, Catherine and Debbie M as they have some mojolicious eye candy for you as well.

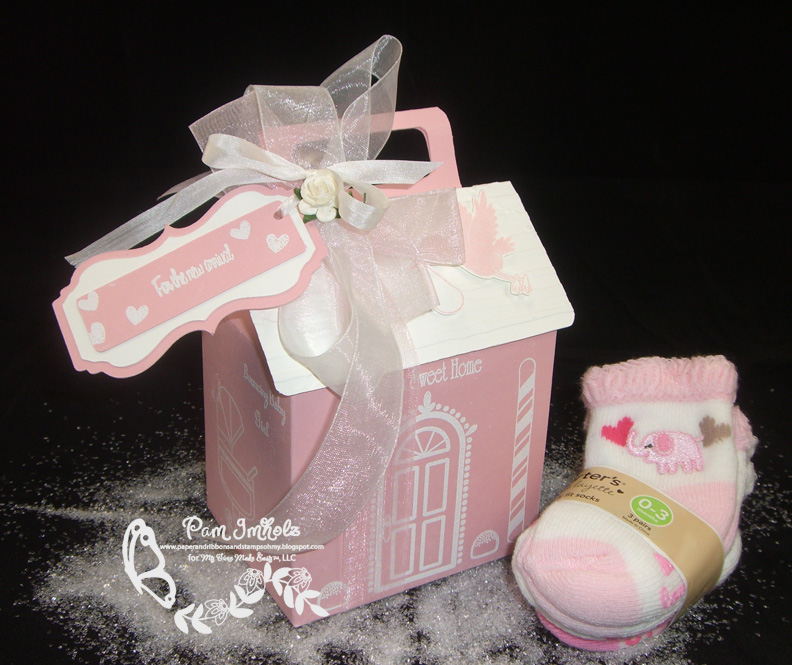
Today I'm featuring the Carry It template which is just adorable. Many of the DT gals have already shown you how super, super cute this is as a gingerbread house - and I intend to make one myself when it's closer to the holidays BUT I wanted to put a different spin on it so I made a gift box for a baby girl.
I made this adorable little box/house to hold a little something for a sweet new baby girl. I work in a school district and have LOTS of opportunities to give just a little something to staff to welcome their new bundles of joy.  GinaK's pink paper from her spring collection made for the perfect base for my house. After I cut it and adhered the sides together I did all of my embossing with white embossing powder before I assembled it.  Here's the front of the house featuring stamps from the new Sugar and Spice set.

A look at the back of the house with the sweet family (complete with one little girl) stamped from the new Gingersnaps stamp set and the window from Sugar and Spice.

One of the sides showcasing the other window and some of the sweet candies from the Sugar and Spice set.
For the other side of the house I stamped and embossed the baby carriage and sentiments from Bringing Home Baby set.
I added the optional "roof" by cutting a piece of white SU! cardstock which I then embossed with my CB folder to make it look sort of like wood grain. I added a cut out stork (from Bringing Home Baby) arriving on the rooftop as my final accent piece then wrapped the whole box up with some ribbons and added tiny prima rose.


I didn't make a card for this gift set since I will write on the back of the tag and leave it on the teacher's desk. :-) I used the great new Trendy Tag cut file #1 (thanks Kristin!!) for this lovely little tag. I love that the layers are perfectly sized to nest - another sentiment and the hearts from Bringing Home Baby stamp set.

Stop back again tomorrow for the final showing of items for My Time Made Easy - the entire team will have ideas for you tomorrow.

Supplies from My Time Made Easy LLC:
Pretty Impressions © Stamps: Sugar and Spice, The Gingersnaps, Bringing Home Baby
Pretty Pieces © Cut Files: Trendy Tags #1


Other Supplies:
Cardstock: Gina K Spring collection - pink
Ink: Versamark
Embellishments: organdy and silk ribbons, prima rose
Tools: Cricut, embossing powder, CB folder

Hugs n Smiles,

Thursday, July 29, 2010

Baby Gift box is all Tuck-ered Out

Hello girls - can you believe it's almost time for the next release from My Time Made Easy?? Lauren has come up with some more fabulous stamps and templates this month. I'm honored to have the opportunity to showcase the new template, Tuck-ered Out.

I needed a gift package for a "little something" for a baby girl and this proved to be the perfect template.


I cut this out of some beautiful pink cardstock then set to decorating it. I used some of Lauren's digi paper on the ends (I love this particular paper pattern available in a LOT of colors) then I added some fun teddy bear ribbon and mini pom poms.  I adhered some tiny pink prima roses to the front edge for a sweet feminine touch.

The label on the top of the box was created with a Labels10 nestie then stamped with two of the stamps from Bringing Home Baby set from MTME. I added a few tiny pink pearls to "prettify" the label.

Of course I wanted to make a card to go with this gift box so I decided to use a shape card made with the blossom nestie as the base. More layers were cut with circle nesties and scalloped circle nestie. Added a bit of the matching digi paper and adhered some of the teddy bear ribbon as well. I added more pearls to match the pearls on the box and a couple more stamped sentiments from Bringing Home Baby.


Now - the fun part-  instead of making this shape card a folded edge card, I made it a swivel open card. I used this technique recently on a JustRite card (you can see it here) and loved it so much I decided to do it again for this one.

Here's the card swiveled open so you can see the inside. I just love that Lauren has made her stamps so versatile that I can use them again and again.


I'll add my note of congratulations to the inside and I'll be all done :-) This adorable new template goes together in a SNAP and is just as cute as a button. I made mine at 100% but I want to try one at a larger scale too.

Be sure to stop by and see Lauren, Tracey, Dawn and Geny for more projects today.

The Details:
Pretty Impressions © Stamps: Bringing Home Baby
Pretty Printables © Digital Paper: Fresh Fabric Collection 3

Hugs n smiles.

Friday, June 18, 2010

Just Us Girls Color Challenge

Hi gals,
Alicia has picked some yummy colors this weeks for the JUGS challenge. What do you think of these?


I have a super quick post because we had a massive storm blow through and I simply ran out of time - I was trying to get this done before the lights went out or we lost electricity.


My photograph doesn't reflect the colors very well. The vanilla IS vanilla but it looks white and my vintage inked edges look green but they are a soft caramelish. Must have been the ugly sky from the storm, SO sorry.

I needed a sweet baby girl card and this color challenge just fit the bill perfectly. This darling set is from Gina K Designs  - called "Oh, Baby!" and I love the images Rupa created. I used last week's Mojo Monday challenge for my layout.

Hope you will stop over at the JUGS blog and play along - we'd love to see what you create!

Hugs n smiles,

Monday, March 1, 2010

Baby Love!

I've got a couple of new Gina K Design stamp sets and papers to share today and you will LOVE them.
First up is Nina Bracket's Lovely Labels - I just LOVE these new stamps - there are stamps in the set that work perfectly with Nestabilities Labels 1, Labels 4, Labels 8 and Labels 9!!! That is good news for all you nesti-holics like me! Add to that Rupa's new Oh Baby!! stamp set and you've got a winning combination.


I started with Gina K's new Lovely Lavender cardstock and added a layer of the new digital paper Swing Into Spring (also by Nina) in Lemon Drop yellow. I punched the edges of the two papers for a lacy effect and added a strip of lavender organdy ribbon under the nestie layer.


I used the plaid/floral label that fits Labels 8, stamped the sentiment and then punched out a Labels 4 layer as the base for a different matted look. I used my Y11 copic to add a touch of yellow to the purple label stamp. The sentiment stamp here and on the inside are from the Oh Baby! set as is the adorable teddy bear. I colored teddy with Y11 and Y00 plus some accents of BV00, added a couple of tiny purple rain drop embellishments to his tummy,  then cut him out and adhered teddy with a couple of pop dots. I added a couple of purple embellishment gems (Hobby Lobby) to the card for a finishing accent.


Finally, a look at the inside. Used the same label stamp from Lovely Labels and colored it the same - added a different sentiment and then matted that layer over a polka dot Lemon Drop DP layer. Stamped the diaper pins in the corner and the card is ready to send. :-)

Hop on over to Gina K Designs and see what's new in the store! Thanks for stopping by.
Hugs n Smiles,

Friday, February 26, 2010

Bringing Home Baby!

I've been a little quiet this week - I'm sure many of my regular followers have figured out that's because it's almost the first of the month and that means time for a new release from My Time Made Easy!! Can I get a big "Oh Yeah?!"

Well today is your first look at an adorable new template and stamp set from the lovely and talented Lauren Meader. The theme for this coordinated set of stamps, template and digital paper is Bringing Home Baby - there are so many possibilities with these newest items so let me share my project with you. (Lots of photos so hang in there.) Both Lauren and Mona are sharing ideas for you today as well.

I am an administrator for a suburban school district so we have lots of babies being born and I like to acknowledge those sweet occasions if I can. SO... let's start with a baby shower invitation - someone recently asked for some simple ideas for a baby shower invite for a boy - was this timely or what?

I started with some of the FABULOUS new digital paper called Bringing Home Baby - this one is the "boy plaid".  I used the stork stamp from the Bringing Home Baby stamp set - and colored him up with copics - I know storks are traditionally white but heck - that's what creative license is all about right?! A snippet of a bow and a few buttons and voilá - a cute but simple invite. The solid yellow, blue and white papers are from Couture Cardstock and they are wonderful - great soft colors and a lovely texture to them as well. The nestie label stamp is a new one from Gina K Designs.

No baby shower is complete without some kind of decorations or party favors so how about this adorable little Bouncing Baby Buggy???

I chose to make mine with the matching boy plaid paper that I used on the shower invite. I love plaids - and this paper is beautiful. (The baby girl paper is stinkin' cute as well) I especially love it because it LOOKS like I did some stitching on it but I didn't :-) A few details on the buggy - you can decorate to your heart's content. I added a fun ribbon bow to the side of the hood,  a little stamped sentiment on the back and some pom poms and ribbon to dress it up. It can also be used without the hood and wheels as a lovely basket (stay tuned later this week *wink* for an idea along those lines).


I added a tag hanging from the handle (since I will use this buggy for a gift but, if it was a favor box you could forgo the tag if you wanted.)

The tag was made using the new Tag You're It cut file (coming to MTME store on March 1) so you can make dozens of tags in any size to meet your needs. I used TWO different tags from the set and matted one on the other - then used the stork stamp again with the sentiment "Heaven Sent". I paper pieced the stork's "bundle" and added a couple of tiny baby feet embellishments for fun.

This little buggy holds a lot - I love to have just a little something to give for the new babies and I love giving these little travels packs of baby essentials and they fit perfectly into the buggy. (I'm SO happy about that!)  That means I can take a simple small gift AND package it up in this adorable little buggy and it takes the gift to a whole new level.  That's the idea behind Lauren's Pretty Packaging - make those gifts say WOW to the recipients. I think the compliment I get most often is "I love that you MADE this for ME!" That says a lot.

For the matching card I used more of the boy plaid digital paper and the carriage stamp from the Bringing Baby Home stamps. (Isn't it cool how it coordinates with the buggy template!) I paper pieced the hood with the matching plaid paper, cut the image with one of my nesties and stamped a nestie stamp from Waltzingmouse Stamps to fill in the frame. A little copic coloring, a few buttons and a snippet of ribbon (not TOO many bows for a boy) and my card was complete.


The inside of cards is also important so here's my inside. Nuthin' fancy but I combined several stamps from the new Bringing Home Baby stamp set to make that little welcome sentiment, stamped a nestie label frame around it all and added a matching paper border at the bottom.

SO that's it for today - lots coming up in the next week so stay tuned for more great ideas and products coming to you from My Time Made Easy.

Products from My Time Made Easy used for today's projects:
Pretty Packaging © template - Bouncing Baby Buggy
Pretty Impressions © stamps - Bringing Home Baby (carriage, stork, sentiments)
Pretty Printables © digital paper - Bringing Home Baby (yellow/blue boy plaid)
Pretty Pieces © cut files - Tag You're It!

Have a great weekend! Hugs n Smiles.

Monday, September 21, 2009

Bitty Blessing

Just a quick post today with a new baby card. I've been off the "baby card wagon" for a while since I made lots of them a while ago - so it was time for a new card since one of my Tech Support guys' wife just had their first baby.

I started with a sketch challenge over on StampTV. I also loved the recent My Time to Create Inspiration Challenge (see post here) with the blue and brown combo and I just got a new border punch :-) All those ideas are what spurred this newest Bitty Baby Blessings creation. The steps are all pretty obvious. Stamping, coloring, sponging, nesties, CB. I did have to stamp the "for baby" sentiment onto two lines to make them fit into my 1" circle.
I added a bit of matching punched CS to the inside with two of the sentiments and stamped and paper pieced the larger sailboat onto the envelope.

Thanks for looking. Have a great week.

Wednesday, July 29, 2009

Baby Card and Bootie

One of my tech support guys is expecting his first baby (a boy) soon. His wife is quite delightful and I'm so excited for them. I decided to throw a baby shower for them at work.

I didn't get a chance to do hand made invitations - just not enough time with everything else I had going on but I did get a chance to make a card and I used the Stocking Stuffer (aka bootie and it's FREE) from My Timeless Templates to package up the small little lotions etc. I used the wrapping paper as my decorative layer on top of PTI Spring Rain and SU Whisper White CS. I used it also on the bootie so the big present and my small additions would all match the party decorations.

I made the bootie from Gina K's Pure Luxury 120 lb. card stock which made it real sturdy. It was the perfect package for the travel gift set of baby shampoo, lotion etc. (Thanks Kristen for giving me the idea for a perfect little extra something to go with the big gift.) The only problem with using wrapping paper on my card/project is that it's not nearly as nice a quality as the DPs I'm used to working with :-)

The wrapping paper was cute enough that I was able to cut out a couple of the images to use on the inside of the card. Just kind if fun. The sentiments on the front and inside are from PTI's Bitty Baby Blessings.

Thanks for looking! Congratulations Keith and Stephanie. Can't wait to meet baby Joshua.

Saturday, February 21, 2009

Baby Toby

I must say that I saw this idea on Split Coast Stampers a long time ago - so this is casing Alice Erikson's Pottery Barn Baby. I changed it up somewhat in honor of my new "nephew" baby Toby. I used Papertrey's Bitty Baby Blessings (it's the only baby set I own so far) and think it turned out cute. I used some SU designer paper, PTI lemon tart, GINAK pure luxury 120 lb cs, dotted swiss cuttlebug, the cute cuttlebug border embosser, and some pastel brads. I had to make the hanger out of some jewelry wire I had on hand. It took me almost two hours to come up with a final version I was happy with. At that rate I'll never have enough cards on hand.

Welcome Baby Toby!

You Might Also Like...

Related Posts with Thumbnails