Showing posts with label Halloween. Show all posts

Friday, October 22, 2010

Keeping you In Suspense

G'morning! It's time for a Just Us Girls template challenge. I hope you will try to play along this week. With the holidays right around the corner, now is the time to try a few templates which make gift giving simple, easy and impressive!!!

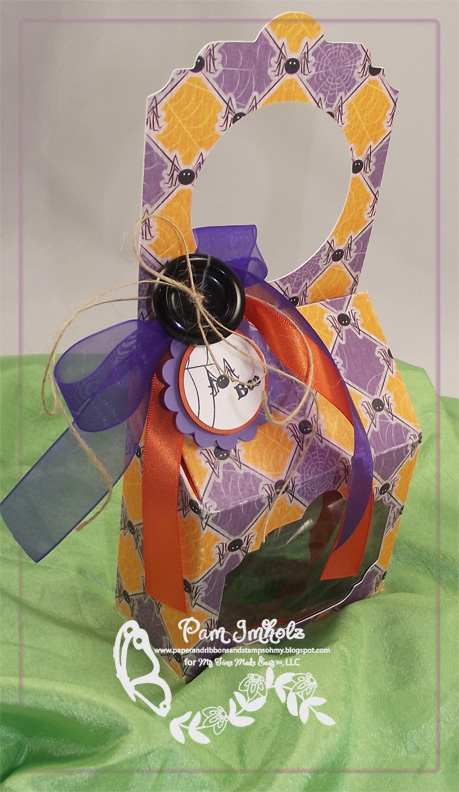
Today we're featuring the In Suspense template from My Time Made Easy. It's designed to hang on a door knob (but I can't photograph them there due to lighting issues - sorry) or the template can stand on it's own.


For this template I printed off some adorable Halloween digi paper onto cardstock then cut out the pieces with my cricut, assembled, filled with goodies, added my bow and tag and I was done!


It's a little hard to see the stamping on the acetate window so here's a photo of it before I assembled the box. Against the white background it's easy to see but when the box is filled with goodies it's hard to see the words on the window. Stamped with Staz-On, colored with Sharpies.

 Here's the simple tag I made - I actually cut apart my sentiment into the three words since I wanted to use them in a stacked fashion instead of a long line.

One last look at the template from the side. Easy Peasy and super fun and SO versatile!!!

I hope you'll come play along this week. Show us your ideas for template projects.  Pop by the Design team (in my sidebar -->) and share a little love. Also please stop and visit Selma our Featured Designer for October - she's done an outstanding job with our challenges and we've been so tickled to have her on board. You might be our next Featured Designer! SO come play with us this week :-)
Have a great weekend,
Hugs n Smiles,

Friday, October 8, 2010

Clearly Fun

Hello girls - thank you ALL of your support for Just Us Girls challenge site. I hope you enjoyed last week's anniversary challenge and prizes! Congrats to our winners and thanks to all of our participants.

Today we move on into year TWO with our next technique challenge. This week we want you to either make a clear card or use acetate somewhere on your card.  I am showing TWO projects this week. The first one is truly a clear card made from clear cardstock (from PTI - you can also use acetate sheets that are typically used for overhead transparencies.)


I stamped the images from My Time Made Easy (Spooky Surprise) with Staz-On ink on the outside and the inside and let them dry. Meanwhile I stamped out my witch feet and stars - colored with copics - cut with Nesties and sponged.  The words at the bottom of the card are actually on the INSIDE.


Sorry for the glare in the photo - it's really hard to photograph cards made with acetate, especially if you use a light tent :-). My inside oval fits exactly behind the outside oval so it can't be seen until you open it up.  I just love these images - soooooo cute!


Here's a shot so you can sort of see how one oval is behind the other one.


The second card also uses clear cardstock as the base but I used rub ons (from SU!) instead of stamping! The rub ons were a little tricky as you can see from the flower that isn't quite all there - LOL  This one also has a larger inside layer so it looks different from the outside.  Our sweet DT member Alicia had a birthday a couple of days ago so we wanted to wish her a 
BELATED HAPPY BIRTHDAY!
so Alicia - this one's for you (although it's not the one I put in the mail to you LOL)

Here's the inside of this one from a partially open perspective...

This one is a view of the inside fully opened - you can sort of see that I adhered the panels with clear mini glue dots so they don't show like my normal adhesive would.


Please stop by the team and see what else is in store for you.
 Just Us Girls Design Team  
Alicia (the birthday girl)
Dana (might not be back from her awesome trip yet)
Selma Stevenson (our Featured Designer) 

Thanks for stopping by - be sure to come play with Just Us Girls - love to see what you make.
Hugs n smiles n happy weekend!


Thursday, September 30, 2010

Boo! A Secret Surprise...

Welcome to the official My Time Made Easy release day. The entire team has some dynomite projects to share with you so be sure you connect to all of them (end of my post is a list of all). We also want you to visit our two Guest Designers, Debbie Marcinkiewicz and Ashley Newell.

Today we are featuring a new template called In Suspense and stamp set called A Spooky Surprise.


I printed off one of the new digital papers onto white cardstock. I then cut the template with my Cricut and assembled it in just a few minutes. I LOVE this template. I made this for Halloween (shhh it's for my son) - it contains an entire bag of gummy worms. I did take advantage of the cut out window on the front. You can hang this template from a door knob or you can set it on a table.  Here's the tag - used part of the spider and web and just the word BOO from A Spooky Surprise Stamp Set.


I added a card for this little set but I kept it simple. I used the new Secret Surprise stamp set.


I'll use this new stamp set over and over. The large frame fits perfectly on the new Secret Surprise Label Cut File. It's also cool that the spider web image fits perfectly inside the frame!

Here's the inside. Isn't that CUTE!?!?


A final look at the template and matching card.


Please stop by the rest of the team and see ALL that you can do with this template and stamp set.


My Time Made Easy Design Team:

 
Supplies from My Time Made Easy LLC:

Pretty Packaging Templates:   In Suspense
Pretty Impressions © Stamps:  A Spooky Surprise, Secret Surprise
Pretty Printable © Digital Paper: Traditional Halloween
Pretty Pieces © Cut Files:  Secret Surprise Label

Hugs n Smiles,

Friday, September 24, 2010

A Wicked Good Time

Good morning everyone. It's Saturday and time for a Just Us Girls template challenge. Lauren has stepped up to sponsor JUGS this month. The October My Time Made Easy release is just around the corner so I also have a "wicked fun" sneak peek to share with you.

The JUGS design team is sharing ideas with you for the template called Tuck-ered Out and it is just adorable. I've turned mine into a Halloween treat box.


I am sharing a sneak peek of the new stamp set from Lauren called Spooky Surprise! It is available for pre-order right now from the store shipping on October 1 OR you can purchase it in digital format now. How fun is that?? I colored the witches feet and the stars on the tag with Copics.

Here is the box opened up. I did resize this to larger than original because I had some yummy Reese's pumpkins to put inside.


Here's a final look so you can see the tucked in sides. I stamped a pattern onto the orange layers with Puckered Up Patterns before I cut them out. I pulled the colors for my template from the Reese's pumpkin packaging.

Please pop over to the Design Team (in my sidebar) to see their projects. Also stop over and leave a little love for Lynn, our Featured Designed this month. This is her last day with us and we thank her for amazing and inspiring projects.

Sorry for the short post - busy, busy weekend ahead of me.
Hugs n smiles,


Supplies from My Time Made Easy LLC:

Pretty Packaging Templates:   Tuck-ered Out
Pretty Impressions © Stamps:  Spooky Surprise (pre-order), Puckered Up Patterns

Other Supplies:
Cardstock: Couture

Ink: SU! Lovely Lilac

Embellishments: Button and floss

Tools: Scor-Tape, nestie, copics

Friday, August 27, 2010

Spooky Sweets

Hey all. Are you ready to jump start your Halloween goodies? Well check out the Just Us Girls challenge this week. It's a template week and our sponsor is Clear and Simple Stamps. They offer a nice assortment of FREE templates (use the search box on their main page) for you to try although you are not required to used theirs to participate.

CSS generously provided the DT gals with their adorably yummy stamp set called Spooky Sweets to use in conjunction with the template of our choice.

Here's what I decided to make:

I chose the free Trick or Treat basket as my template. Super easy to pull together and über cute, too. I started by making my own DP with several of the stamps from Spooky Treats. Here's a snippet of my paper.


I then used this paper to create the basket.  I wanted to make a card to go with this adorable treat basket.


You can't see it very well in this photo but I used PTIs woodgrain impression plate on the orange BG. I stamped and colored the other icons for my tiny squares. A few glitter dots and some scrumptious ribbon finished it off.

Here's the inside. I double stamped the cauldron so the "steam" would appear more steamy...


Here's the whole set I'll give away for Halloween. When I give it to one of my friends I'll fill it with yummy Halloween candy but I wasn't ready to bring candy into the house just yet LOL (since I would eat it).


I hope you'll come play along with Just us Girls. Clear and Simple Stamps will be offering TWO prizes this week, Check it out on the JUGS blog for the details and be sure to visit the rest of the DT as well.

We say fond farewell to our Featured Designer this month, Jo Westfoot. She's done a marvelous job with all of her JUGS projects and it's been great having her on board with us. Stay tuned for a new Featured Designer next week.

Thanks for stopping by - sorry I've been MIA - this was the first week of school and, as Director of Technology for my district,  I've been a wee bit busy LOL. I'm looking forward to a weekend of rest! Have a great weekend.


Hugs n smiles,

Friday, September 25, 2009

PTI Blog Hop

Wow it's September 25th already! You know what that means - time for PTI Blog Hop. This month's assignment was to reuse, repurpose or recycle packaging from our Papertrey Package. I keep all of my clear plastic boxes that my stamp sets ship in so I thought I'd work one of those into something other than a box to hold a set of gift cards.

I came up with a simple Halloween Treat container - made from one of the clear boxes. I'm sorry the photos aren't real bright - it was foggy and overcast today when I needed to photograph. I trimmed off the top of one of the boxes then covered both sides of the box with some Smokey Shadow CS that had been punched along the edge with my lace apron punch. I used Scor-Tape to adhere the CS to the box so it wouldn't lift up. I added a layer of one of the new Hocus Pocus papers and a "belly band" around the entire box. Next, using my new Vintage Labels, my Labels One nestie and my new Halloween Tags, I created a fun label for the front of my treat container. I added a ribbon handle made from True Black gros grain paired with Orange Zest Bitty Dot. I covered up the ends of the ribbon with Vintage Buttons and then tied on some additional ribbon to just fall loosely over the edges for a fun look. This box is filled with Werther's candy - a favorite of a special someone in my family (wonder who'll be getting this box?). It holds an entire bag of Werthers!! Here are a couple of shots of the detail on the label/tag plus the button detail on the other end of the box.

Looking forward to seeing what everyone else has come up with. I'm sure there will be some spectacular ideas. Happy hopping stampers!

You Might Also Like...

Related Posts with Thumbnails