I made this gift set for one of my Administrative Assistants who really needs to Take Time and Pamper herself! Here's the complete gift set - the deets will follow.

Here's a pic of all the items that I packaged up (Lotion, Gel, Body Scrub and "scrubbie"). I LOVE that I can make my own labels for the Bath and Body products. Seems to be more personal this way. :-)

I have some full sheets of adhesive paper by Avery (yes, the label people) and simply stamped my images from the new Take Time stamp set onto that paper, colored, cut out then peeled off the backing and adhered these labels to the bottles. They can be removed by the recipient (especially the shower gel) if desired.
Here's the sweet Pretty Packaging Template called Take Time Pocket - a perfect package for these two bath items.

I printed off some of Kristin's digital papers - (I wanted some fresh, fun, bright and cheery colors) Darling Dots in Fallen Leaf then I used my Cricut to cut the decorative mat layers for the box. I also lined the inside with the new Perfect Petals paper (I tweaked the colors to match Darling Dots.)

I wanted to accent the yellows in my labels so I used a fun gradient yellow ribbon from Hobby Lobby. I colored one of my buttons with Copics to perfectly match the paper color :-)
After I packaged up the lotion and shower gel I still had the body scrub and "scrubbie" to package.


I used the same papers and ribbon but this time I topped it off with the new Ramblin' Rose cut file from Lauren. Here's a close up of the beautiful rose you can create with this cut file. (Cut files do not typically come in PDF format - they are usually designed to be used with a cutting machine.) The very center of my rose is a tiny Prima rose in deep yellow - it was a perfect center but you can easily use a pearl or brad as well. I finished with a tiny sprinkle of glitter.

One final look at the whole set - I do think my Admin Asst. will love it! (And I'm glad she doesn't read my blog LOL)

Ok - I know this post is already really long but for those of you who are interested, I thought I'd show you the steps I took to make that Rambling Rose. These may not be exactly the way Lauren will show us but it's based on a conversation I had with her asking "How do I do that!?!?" *grin*
1. Use your cutting machine to cut out the 6 pieces of the Rambling Rose. I used a light weight, textured cardstock from Couture Cardstock.

2. Run each piece through your crimper, multiple times. The idea is to "soften" the paper to make it easier to work with - this is similar to the "crumpling" step that some gals use.

3. Use a bone folder to completely rub out the crimping lines. Go back and forth and in multiple directions so it's almost smooth again.

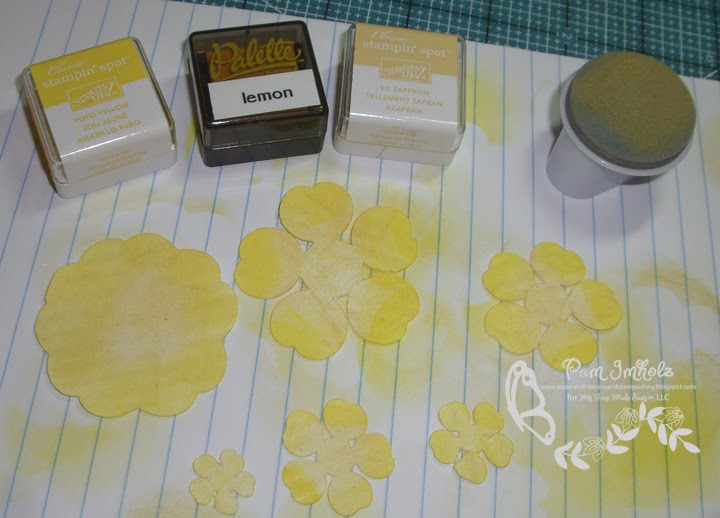
4. Sponge, color or airbrush each layer. You'll want to use multiple colors - I used 3 yellows AND finished the final edges with a dark yellow Copic. I also sponged the back with the So Saffron in case any of the petals are turned up.
5. Take the ball end of an embossing stylus and go around the center circle then I also press down in the middle - this lifts up the petals.


6. Roll the edges of your petals around your tweezers - I rolled in different directions on different layers.

7. Layer all your petals together - I used a SU dimensional between each layer - then use a paper piercer to pierce all the way through the layers. (My photo was taken before I added the dimensionals - sorry).

8. Add your brad or center piece. Tweak any petals that need adjusting. I also added a few touches of glitter for some sparkle.

And there you have it. It was my first attempt - I think I'll get better as I make more of these but they do make a stunning accent piece! Now - swing by the rest of the team and see what they have for you today.
♥♥♥♥
My Time Made Easy Design Team:
The Deets for my project:
Pretty Impressions © Stamps: Take Time, Petal Perfection
Pretty Packaging © Template: Take Time Pocket, Shutt-erfly
Pretty Printables © Digital Paper: Darling Dots, Perfect Petals
Pretty Pieces © Cut Files: Rambling Rose
♥♥♥♥♥♥♥♥♥♥♥♥♥♥♥♥♥♥♥♥♥♥♥♥♥♥♥♥♥♥♥♥♥♥♥♥
Hugs n smiles,
